
MARGO FINGERLESS GLOVES
- Oct 22, 2019
- 1 min read


ONLINE CROCHET PATTERN: The Margo Fingerless gloves feature a fun puff pattern on the cuff and textured body.
SKILL LEVEL: Intermediate
YARN: Approximately 150 yards of worsted weight #4 yarn.
HOOK: 5mm crochet hook (or hook size that achieves gauge)
GAUGE: 16 stitches & 16 rows = 4” of the row 4-5 pattern repeat (body of gloves)
EXTRAS:
Tapestry needle
scissors.
SIZES: Adult women's sizes Small-Large. Easily modify the length to your personal preference.

PATTERN NOTES
If you would like your project to turn out the correct size, always achieve gauge before beginning.
This pattern includes adult sizes Small-Large
Sample photos are of size small gloves.
Knowledge of colour changing techniques is required for this pattern.
If the number comes before the abbreviation for example: 2hdc, this means stitch the given number into the same stitch. If the number is given afterward, for example: hdc2, this means to half double crochet the given number over subsequent stitches.
Slip stitch to join rounds.
Fasten off and weave in all ends when you are finished.
ABBREVIATIONS
ch Chain
st Stitch
sc Single Crochet
slst Slip stitch
sk Skip
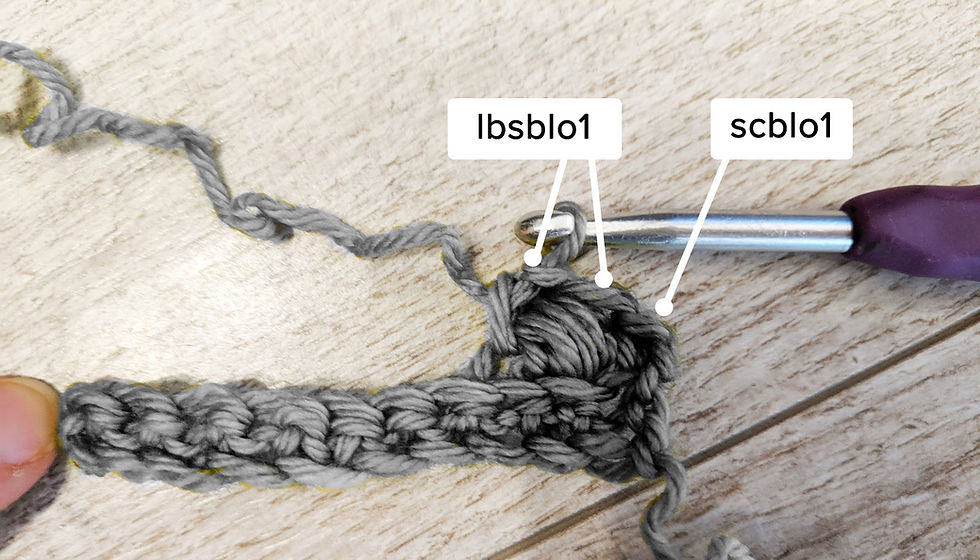
scblo Single crochet in the back loop only
lbs Large bean stitch
hk Hook
yo Yarn over
hdc Half double crochet
3rd loops Thirds loops (see third loops under special stiches)
pm Place stitch marker
[ ] Repeat instructions between brackets as directed
pm Place stitch marker (mark the indicated stitch with a stitch marker)
RS Right side of the piece. The side that will be facing outwardly
WS Wrong side of the piece. The side that will not be facing outwardly
SPECIAL STITCHES/EXTRAS
Third Loops (3rd loops)
There are half double crochet (hdc) stitches included throughout this pattern. Half double crochet stitches have a 3rd loop that is located just below the front loops. When instructed to stitch into the 3rd loop, only insert your hook into this loop (ignoring the front and back loops). This creates a braided look on the opposite side of the garment.
*You will only be working into the third loops when the wrong side of the garment is facing you for this pattern.

Large Bean Stitch in the Back Loop Only (lbsblo)
The large bean stitch will span over 2 stitches (so each large bean stitch counts as two stitches). Yarn over and insert your hk into the indicated stitch, yarn over and pull up to working height 4x total. Yarn over and pull through all of the loops on the hook, then single crochet 1 in the next stitch to complete 1 large bean stitch
*All of the large bean stitches in this pattern are worked into the back loops only.
RIBBING
R1: (RS) ch11, yo & insert your hk into 2nd ch from hk & sc10, turn.
Note: Work into the spiny bumps of the chain. Also, leave a 10 inch tail (this will be used for seaming later)

R2: (WS) ch1, scblo1, lbsblo1, scblo6, sc1 in the last st, turn.
10
*Large bean stitches (the large bean and scblo immediately after (see special stitches)) span over 2 stitches and count as 2 stitches each here, and for the rest of the pattern.
*Keep the chain 1’s on the looser side for the ribbing portion of the glove.
R3: (RS) ch1, scblo9, sc1 in the last st, turn.
10
R4: (WS) ch1, scblo4, lbsblo1, scblo3, sc1 in the last st, turn.
10
R5: (RS) ch1, scblo9, sc1 in the last st, turn.
10
R6: (WS) ch1, scblo7, lbsblo1, sc1 in the last st, turn.
10
R7: (RS) ch1, scblo9, sc1 in the last st, turn.
10
R8: (WS) ch1, scblo4, lbsblo1, scblo3, sc1 in the last st, turn.
10
R9: (RS) ch1, scblo9, sc1 in the last st, turn.
10
R10: (WS) ch1, scblo1, lbsblo1, scblo6, sc1 in the last st, turn.
10
R11: (RS) ch1, scblo9, sc1 in the last st, turn.
10
R12: (WS) ch1, scblo4, lbsblo1, scblo3, sc1 in the last st, turn.
10
R13: (RS) ch1, scblo9, sc1 in the last st, turn.
10
R14: (WS) ch1, scblo7, lbsblo1, sc1 in the last st, turn.
10
R15: (RS) ch1, scblo9, sc1 in the last st, turn.
10
16: (WS) ch1, scblo4, lbsblo1, scblo3, sc1 in the last st, turn.
10
R17-24: Repeat Rows 9-16 until you reach 24 total rows.
10
BODY
R1: (RS) slst to join Row 1, forming a circle. ch1, hdc24 (28, 32), evenly across (working into the unworked edge of the ribbing) do not join, turn.
24 (28, 32)

CUFF SEAM
Thread a tapestry needle with the tail you left back at Row 1 of the cuff.. Stitch through both bottom edge stitches to start, then both loops of the left side and the back loop only of the other side until all the stitches are joined. Weave in ends

R2: (WS) Pull up your new colour with existing (you will now be carrying colours). ch1, sc in 3rd loops only across, turn.
24 (28, 32)

R3:RS ch1, hdc across, turn.
24 (28, 32)
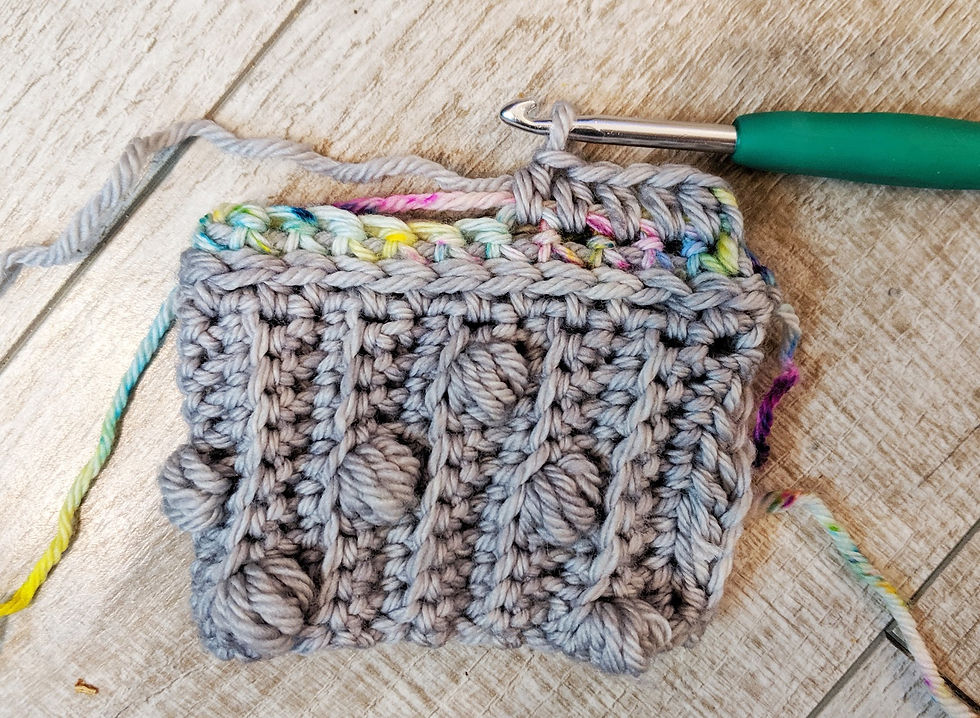
R4: (WS) ch1, sc in 3rd loops only across, turn.
24 (28, 32)
R5: (RS) ch1, hdc across, turn.
24 (28, 32)
6-13 Repeat rows 4-5 4 times, do not turn on the last row.
24 (28, 32)
THUMB HOLE/THUMB SEAM
R1: (RS) Cut your secondary colour, leaving a tail approximately 5 inches, hdc12 all the way to the cuff (you can work around the 5 inch tail piece),
*Note: slst51 around, keeping the slst’s loose (you may want to go up a hook size here), join, fasten off leaving a 10 inch tail.
*If you have added extra rows for length, modify your stitch counts accordingly.


THUMB SEAM
Thread a tapestry needle with the 10 inch tail and sew the edges of each side together until you reach your desired thumb opening size. Fasten off & weave in all ends.


FINISHING
Weave in all ends.
CONGRATULATIONS YOU ARE FINISHED!
SHARE YOUR WORK AND TAG
@POPPYSHOP.CA & #MARGOFINGERLESSGLOVES
WANT THE PRINTABLE VERSION OF THIS PATTERN?