

Search Results
Find what your looking for!
304 results found with an empty search


Blog Posts (121)
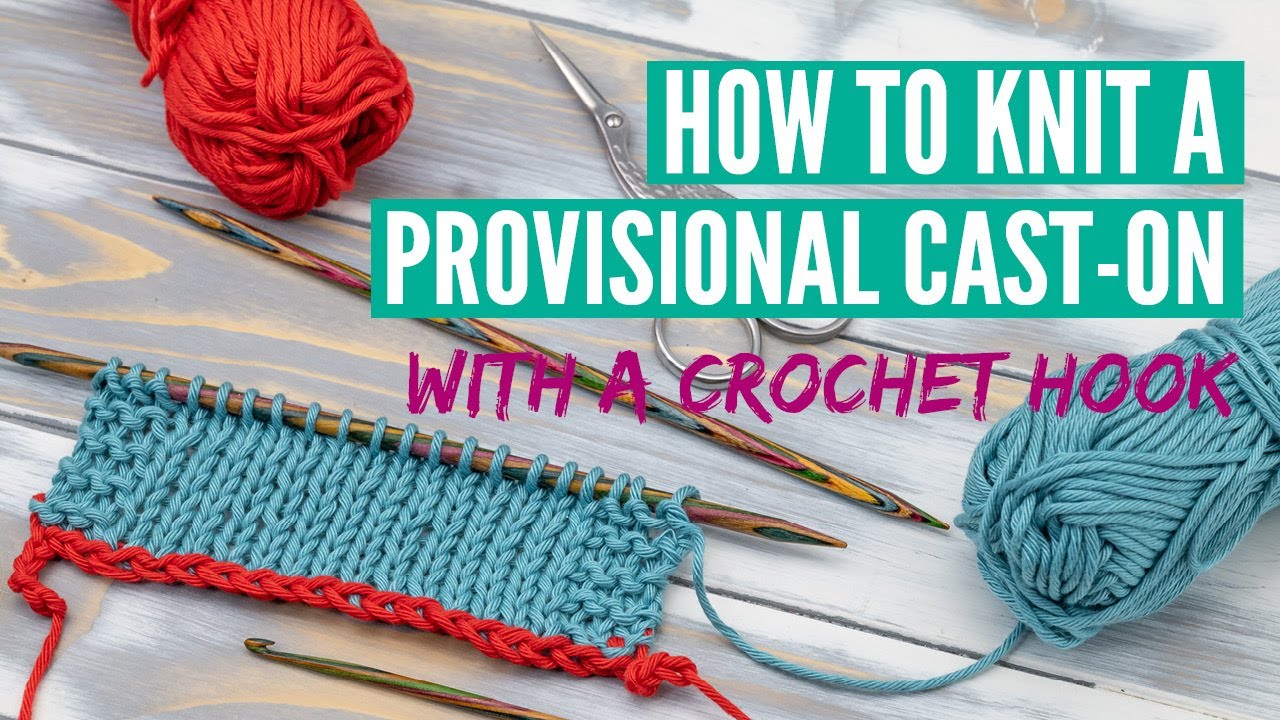
- Solve Your Knitting Challenges with the Provisional Cast On
Ever wished you could try on your sweater before committing to the final bind off? Or wanted to add a perfectly integrated border to your shawl? The provisional cast on is the answer! This technique gives you the flexibility you need for professional-looking projects, and we'll show you how to do it. The provisional cast on might sound intimidating, but it's a game-changer for knitters. It allows you to create a row of stitches that can be easily picked up and worked later, opening up a world of possibilities for seamless construction, intricate designs, and garment fitting. Why Use a Provisional Cast On? This versatile technique offers solutions to common knitting challenges: Seamless Construction: Imagine knitting a sweater from the top down, or a cowl in the round, without any seams to sew. The provisional cast on makes it possible! Perfect Borders and Edgings: Achieve a polished, professional look by adding borders or edgings seamlessly to your projects. Garment Fitting: Especially helpful for garments, the provisional cast on allows you to try on your project as you go, ensuring a perfect fit before you finish. Intricate Colorwork: Some colorwork techniques benefit from a provisional cast on, allowing for cleaner and more precise designs. What You'll Need: Yarn: Choose a yarn that contrasts in color and/or texture from your project yarn. This makes it easier to see and pick up the stitches later. Smooth yarns work best. Needles: Use the same size needles you'll be using for your project. Crochet hook: Slightly smaller than your knitting needles. Scissors: For snipping the crochet chain. Let's Get Started! Create a slip knot: Place a slip knot onto your knitting needle, just like you would for a regular cast on. Crochet chain: Using your crochet hook and provisional yarn, create a chain that is a few stitches longer than the number of stitches you need for your project. For example, if you need 20 stitches, crochet a chain of about 25 stitches. This extra length gives you room to maneuver. Slip stitch onto needle: Slip the first loop of your crochet chain (the one furthest from the hook) onto your knitting needle. This is your first stitch. Knit into the chain: Now, using your project yarn , knit into the back bump of each stitch of the crochet chain. This is a little fiddly at first, but it gets easier with practice. Continue knitting until you have the required number of stitches on your needle. Secure the end: Cut the tail of your crochet chain, leaving a tail of a few inches. Pull this tail through the last loop on your crochet hook to secure it. This prevents your chain from unraveling. You've Done It! Congratulations! You've successfully completed a provisional cast on. Your stitches are now held securely on your needle, ready to be worked. You can now begin knitting your project as instructed. Picking Up the Stitches: When you're ready to work the provisional stitches, simply unravel the crochet chain, one stitch at a time, and place the resulting loop onto your knitting needle. Make sure you are picking up the correct leg of the stitch (usually the back leg). Tips and Tricks: Practice makes perfect: Don't get discouraged if your first attempt isn't perfect. Like any new technique, it takes practice. Keep your tension even: Try to maintain even tension while crocheting the chain and knitting the stitches. This will make it easier to pick up the stitches later. Use a stitch marker: Place a stitch marker at the beginning of your provisional cast on row to help you keep track. e provisional cast on might seem daunting at first, but with a little practice, you'll be using it like a pro in no time. So grab your needles, yarn, and crochet hook, and give it a try! Happy knitting!
- Paint With Yarn | Embellishing Knits with Duplicate Stitch
Have you ever finished a knitted project and wished you could add a little something extra? A pop of color, a small motif, or even just a personalized touch? That's where duplicate stitch comes in! This seemingly magical technique allows you to "knit" onto your finished fabric, opening up a world of creative possibilities. What Exactly is Duplicate Stitch? Essentially, duplicate stitch is a form of embroidery that mimics the look of knitted stitches. Instead of working with needles and yarn to create new stitches, you use a tapestry needle to trace over existing stitches, effectively "duplicating" them. This creates a seamless, integrated design that looks like it was knitted in from the start. Why is Duplicate Stitch So Useful? Adding Color and Detail: Want to add a contrasting stripe, a small picture, or even initials to your project? Duplicate stitch lets you do it without having to knit it in. Fixing Mistakes: Did you accidentally knit a few rows in the wrong color? Duplicate stitch can be used to cover up those mistakes and make them disappear. Personalizing Your Projects: Add a unique touch to your gifts or create one-of-a-kind designs for yourself. Working on Finished Fabric: It's perfect for adding embellishments after your project is complete, giving you more flexibility in your design process. Single Motifs on Circular Knits: When working a hat or other project in the round and you only need a single, small motif, duplicate stitch is ideal. It eliminates the need to carry secondary colors around the entire circumference, avoiding long floats and potential tension issues. This creates a clean, efficient way to add isolated designs. Adding Embellishments After Blocking: Sometimes it is easier to add embellishments after the project has been blocked. This allows the knitter to see the true shape and size of the project, and to place the embellishment in the perfect location. How to Do Duplicate Stitch: Thread your tapestry needle: Choose a yarn that matches or contrasts with your project, depending on the desired effect. Locate the stitch: Find the stitch you want to duplicate. Insert the needle: Insert the needle under both legs of the "V" of the stitch below the stitch you are duplicating, going from right to left. Pull the yarn through: Pull the yarn through, leaving a tail on the wrong side. Insert the needle into the top of the stitch: Insert the needle into the top of the stitch you are duplicating, going down through both legs of the “V”. Insert the needle into the bottom of the stitch: Insert the needle back into the bottom of the stitch where you first started. Pull the yarn through: Pull the yarn through to complete the stitch. Repeat: Continue working across or following your chart to create your design. Tips for Success: Use a tapestry needle: Its blunt tip will prevent you from splitting the yarn. Keep your tension even: This will ensure that your duplicate stitches blend seamlessly with the knitted fabric. Follow a chart: If you're creating a complex design, use a chart to guide you. Practice: Like any new technique, duplicate stitch takes practice. Start with simple designs and gradually work your way up to more complex ones. Blocking: after you have finished your duplicate stitch, blocking can help even out the stitches, and make the design look even better. Unleash Your Creativity! Duplicate stitch is a fantastic tool for any knitter's arsenal. It's easy to learn, versatile, and allows you to add a personal touch to your projects. So, grab your tapestry needle and some yarn, and start experimenting! You'll be amazed at the beautiful designs you can create.
- The Secret to Perfect Crochet Fit | Mastering Gauge and Pattern Adjustments
Gauge: it's the foundation of successful crochet, yet it can also be a source of frustration for many makers. Achieving the right gauge ensures your projects fit as intended, but the path to gauge mastery isn't always straightforward. This guide explores the nuances of crochet gauge, offering insights and solutions to help you confidently tackle any pattern. Understanding Gauge: The Key to Crochet Success Gauge refers to the number of stitches and rows you crochet within a specific measurement, typically 4 inches or 10 centimeters. It's the blueprint for your project's dimensions, ensuring the final piece matches the designer's vision. Why Gauge Matters: Accurate Sizing: Matching the pattern's gauge guarantees your finished project will fit correctly. Proportions and Drape: Gauge influences how your stitches lay and how the fabric drapes, affecting the overall look and feel of your creation. Yarn Usage: Achieving the right gauge ensures you use the estimated amount of yarn, preventing unexpected shortages or excess. Common Gauge Challenges (and How to Overcome Them) Even experienced crocheters can encounter gauge discrepancies. Here are some common challenges and strategies to address them: Tension Variations: Our tension can change depending on our mood, the time of day, or even the complexity of the stitch pattern. Practice consistent tension through mindful crocheting and regular breaks. Yarn Inconsistencies: Different yarns have different properties. Even within the same yarn weight, fiber content and construction can affect gauge. Always swatch with the yarn you plan to use for your project. Hook Size: Using a different hook size than the one recommended in the pattern can significantly impact your gauge. Experiment with hook sizes to fine-tune your tension. Reading Charts and Patterns: Misinterpreting stitch patterns or chart symbols can lead to unintended gauge variations. Carefully review the pattern instructions and seek clarification if needed. Tips for Gauge Mastery Swatch with Purpose: Treat your swatch as a mini version of your project. Use the same yarn, hook, and stitch pattern. Measure your gauge after blocking to account for any changes in the fabric after washing. Adjust Your Technique: If your gauge is too loose, try using a smaller hook or crocheting more tightly. If your gauge is too tight, try a larger hook or relax your tension. Embrace Modifications: Don't be afraid to modify patterns to fit your gauge. Adjusting stitch counts or repeating pattern elements can help you achieve the desired size. Tools for Gauge Success Gauge Ruler: A dedicated gauge ruler with clear markings makes measuring your gauge quick and accurate. Stitch Markers: Use stitch markers to define your gauge swatch area, making it easier to count stitches and rows. Digital Calculators: If adjusting patterns to match your gauge feels like a daunting task, our Crochet Gauge Converter can help! This handy tool, compatible with both Excel and Google Sheets, takes the guesswork out of recalculating stitch and row counts. Simply input your gauge and the pattern's gauge, and the converter will do the rest. Beyond Gauge: Embracing the Crochet Journey While gauge is crucial, remember that crochet is a creative journey. Embrace experimentation, learn from your experiences, and don't be afraid to deviate from the pattern if it serves your artistic vision. Most importantly, enjoy the process of creating something beautiful with your own two hands.


Other Pages (56)
- Neon Nectar | Poppy Shop
Neon Nectar Add paragraph text. Click “Edit Text” to update the font, size and more. To change and reuse text themes, go to Site Styles. Previous Item Next Item
- Crochet Hook Conversion Chart | Poppy Shop
Find the perfect crochet hook size with our easy-to-use conversion chart for US, UK, and Canadian sizes. Simplify your next project with accurate sizing! Crochet Hook Conversion Chart Compare US, UK, and Canadian Crochet Hook Sizes at a Glance Metric (mm) US Size UK/Canadian Size 2.0 mm - 14 2.25 mm B-1 13 2.5 mm - 12 2.75 mm C-2 11 3.0 mm - 10 3.25 mm D-3 - 3.5 mm E-4 9 3.75 mm F-5 - 4.0 mm G-6 8 4.5 mm 7 7 5.0 mm H-8 6 5.5 mm I-9 5 6.0 mm J-10 4 6.5 mm K-10.5 3 7.0 mm - 2 8.0 mm L-11 0 9.0 mm M/N-13 00 10.0 mm N/P-15 000 12.0 mm O - 15.0 mm P/Q - 19.0 mm Q - 25.0 mm U -
- Contact Us | Get in Touch | Poppy Shop
Feel free to reach out! Contact us for any inquiries or assistance. We're here to help. Contact Us We Would Love to Hear From You! Send Message


